cisco IOS cheatsheat
quick IP config
#config t
(config)#ipv6 unicast-routing
Reset to defaults
http://www.cisco.com/en/US/products/sw/iosswrel/ps5187/products_tech_note09186a00802017a1.shtml
quick IP config
Reset to defaults
http://www.cisco.com/en/US/products/sw/iosswrel/ps5187/products_tech_note09186a00802017a1.shtml
I found a great way to lock yourself out of every machine in your domain, just disable the RPC service.
Since the netlogon service relies on RPC, if you disable RPC on your domain you will no longer be able to log into a domain account. Furthermore, the client won’t be able to talk to the domain controller, so even if you re-enable it, the machine will never know.
The only fix I found is to boot off the windows CD into recovery mode and run “enable rpcss service_auto_start”
Every quarter the Federal Desktop Core Configuration folks release new GPOs and VHD files which you can use to build machines which they deem ‘secure’. You can use these machines to test FDCC products (like Qualysguard). The machine they provide should show a ‘passing’ statement for each of the secure configuration items.
Once you’ve downloaded the VHD file, you’ll need a windows machine with Virtual PC 2007 installed. Create a new VPC machine and replace the VHD file of that machine with the one you downloaded. Then open VMWare converter and select “Backup image or third-party virtual machine”. Then browse to the VPC machine you recently created (for me its “\\10.10.10.92\c$\Documents and Settings\Administrator\My Documents\My Virtual Machines\win7alpha\win7alpha.vmc”). Select your vSphere host as your destination and let the conversion begin.
With this server you can backup large amounts of data (like VMWare VCB backups) and all duplicate data will be ignored. This will usually make 10 TB of backups less than 1TB.
First calculate how much memory you’ll need using this calculation:
<Size of your DeDup Volume in MB> / <blocksize (4 for VMWare images) * 33 = Amount of memory needed in MB
Install ubuntu 10.04 server with openssh server and samba server
scp jdk-7-ea-bin-b98-linux-x64-17_jun_2010.bin.sh root@dedup:~/
chmod 755 jdk-7-ea-bin-b98-linux-x64-17_jun_2010.bin.sh
./jdk-7-ea-bin-b98-linux-x64-17_jun_2010.bin.sh
mv jdk1.7.0 /opt/
add this to ~/.bashrc “export JAVA_HOME=/opt/jdk1.7.0/jre
source ~/.bashrc
sdfs-latest.tar.gz (0.9.2 at the moment)
tar -xvzf sdfs-latest.tar.gz
Create your volume
./mkfs.sdfs –volume-name=sdfs_vol1 –volume-capacity=800GB –io-chunk-size=4 –io-max-file-write-buffers=150
Mount your volume
change -Xmx2g to -Xmx8g for 8GB of memory (modify mount.sdfs)
./mount.sdfs -v sdfs_vol1 -m /dedup
If it hangs on “Mounting Filesystem” then you are in good shape, do some copies to /dedup to make sure java isn’t going to crash. If you don’t see any error messages then its working.
The cache will be located at /opt/sdfs/
OpenDeDup is a very new project, follow it at http://opendedup.org/
Now to setup the samba share, add this to /etc/samba/smb.conf
I have a master DNS server at 10.10.10.1 and a slave at 10.10.10.2
The master server needs this for each zone:
type master;
allow-transfer {10.10.10.2};
also-notify {10.10.10.2};
notify yes;
The slave server needs this for each zone:
type slave;
masters {10.10.10.1;};
Now whenever you modify a dns record on the master, increment the serial number and restart the service (or rndc reload) the changes will propagate to the slave. Note: the serial is generally the date but it doesn’t have to be, start it at 01 (before you setup your slave) and increment it if you like.
List out all your disks to see which ones are mapped to which /dev/sdx
#fdisk -l
Delete any existing partitions with fdisk -> d -> w
#fdisk /dev/sda
Use pvcreate to prepare the disks
#pvcreate /dev/sda; pvcreate /dev/sdb; pvcreate /dev/sdc; pvcreate /dev/sdd
Create a volume group
#vgcreate VolGroup00 /dev/sda /dev/sdb /dev/sdc /dev/sdd
Check to see total size of volume group
#vgdisplay VolGroup00
Create a volume group spanning the entire space
#lvcreate VolGroup00 –size 3.63T -n LogVol00
Create the filesystem
#mkfs /dev/VolGroup00/LogVol00
Map the new filesystem to a folder
#mkdir /backup; mount /dev/VolGroup00/LogVol00 /backup
Thats it, modify your fstab if you want it to mount on boot.
If you need to remove a drive which has failed use this:
#vgreduce VolGroup00 –removemissing –force
These servers are great if you only need 4 drives, but what if you want to LVM or RAID 4 of the drives and then have a 5th drive for the OS? There is no power available for a 5th drive, nor any space. Luckily there are 2 internal USB ports. You can use a thumbdrive but if you want better longevity or don’t want to have to tweak your OS for fewer writes, a 2.5″ hard drive will fit nicely, assuming you don’t have a DVD drive.
First, take a 2.5″ hard drive enclosure and remove the motherboard from the enclosure.
Then mount the drive where the DVD would be and run the cables to the USB port.
Now you can install your OS from a thumb drive or USB-CDROM. After that you can set the default boot device to “Internal USB: <drive serial number>”
I have a Samsung ML-2010 connected to a ubuntu desktop. Sharing it with my macbook was surprisingly easy.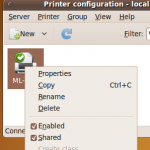
First make sure you can print locally on your ubuntu desktop.
Then go to System-> Administration-> Printing
Right click on the printer and check the box “Shared”
Then make go to Server -> Settings… and check the Publish.. and Allow… boxes.
Now your ready to configure your mac:
System Preferences -> Print & Fax -> + (to create a new printer)
Then go to advanced and put in the info from this picture. If advanced is missing, right click and customize the toolbar, then drag the advanced button to the toolbar.
If your printer isn’t available as a selection at the bottom, you’ll need to install the software.
Setup a http load balancer in about 20 seconds using pen.
First, make sure the server you are on is NOT running anything on port 80.
Next install pen with “yum install pen” (or apt-get install pen) and then you just start it using this:
# pen 80 web1.domain.com web2.domain.com web3.domain.com
Say you ran this command on the server web.domain.com, now when you access http://web.domain.com it will balance the request between web1 web2 and web3. See the man page for more details.
Easy peasy.
This one leverages the VMWare APIs and queries all your hosts. You’ll need the VMWare Perl APIs installed on the system. It outputs to a web page so you can crontab it to run once a day and then just check the website when you need to see what memory or disk space is available on each host.
For accurate memory usage, modify /usr/lib/vmware-viperl/apps/host/hostinfo.pl with however much memory you have installed. For example, if you have 6GB of memory then it would look like:
Configuring ipv6 with AIX was pretty easy, I used “smitty tcpip” to configure everything.
The challenge came when I attempted to configure a default gateway. I couldn’t find this on google. Through trial an error I found the answer:
Smitty tpcip -> IPV6 Configuration -> IPV6 Static Routes -> Add an IPV6 Static Route
Destination type: net
IPV6 Destination Address: ::
IPV6 Gateway Address: <your gateway>
Cost: 0
PrefixLength: <blank>
Network Interface: en0 (usually)
Enable active dead gateway?: no
Deleting routes is equally trick. To delete a route 2001:470:470:470::/64 -> 2001:470:470:470::1 use
# route delete -inet6 2001:470:470:470::
I couldn’t find a solution anywhere but here is how I got it working.
The printer is connected to windows 7 and shared with the name SAMSUNG.
I download the samsung drivers for OS X from support-us.samsung.com and install my Macbook. Then I go to
System Preferences -> Print&Fax -> (Plus Sign)
Tab -> Advanced
Type: Windows
Device: Another Device
URL: smb://user:password@<ip_address>/SAMSUNG
Name: SAMSUNG (doesnt matter)
Location:10.18.18.118(doesnt matter)
Print Using: Select Printer Software -> Samsung ML-2010
Click Add and you should be able to print from your Mac now.
 I wasn’t able to find this on google so here you go:
If you see “Could not acquire an authentication ticket for the query service: https://vcenter.example.com:8443/vms” try restarting the services VMWare VirtualCenter Management Webservices & VMWare vCenter Orchestrator Configuration.
This error is received when trying to use the new global search box located in the upper-right of the new vCenter.
Don’t forget to set the Orchestrator service to automatic if its set to manual, otherwise it wont start on boot.
I wrote a simple script which creates a snapshot on multiple machines. This can also be used to delete snapshots on multiple machines. You’ll need vmware SDK for perl and an answer file with IPs separated by a carriage return like:
192.168.1.100
192.168.1.101
Then use this script:
#!/bin/bash
API_User=administrator
API_Password=INSERT_PASSWORD
snapshotName=test
answerFile=./answerFile.txt
destinationFile=/var/www/default/htdocs/SnapshotsCreated.txt
date >> $destinationFile
echo ” ” >> $destinationFile
for machineIP in `cat $answerFile`
do
echo ” ” >> $destinationFile
echo “##### “$machineIP” #####” >> $destinationFile
/usr/lib/vmware-viperl/apps/vm/snapshotmanager.pl –url https://myVirtcenter.myCompany.com/sdk/vimService –username $API_User –password $API_Password –IPaddress $machineIP –operation create –snapshotname $snapshotName >> $destinationFile
echo ” ” >> $destinationFile
date >> $destinationFile
exit 0
 I bought a refurbished Philips 42″ plasma back in 2006 and today I noticed some strange behavior. The bottom half of the screen would either go black or experience extreme distortion. I figured it was hopeless but then I gave it a good kick and it fixed it. It would reoccur but it could usually be fixed with another kick. Of course this usually indicates a bad contact somewhere, but finding it might not be easy.
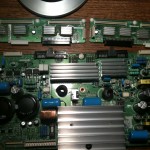 Once you get the back off you’ll see 2 boards along the left, the top one controls the top half of the screen, the bottom, likewise. They attach to eachother as well as the another, larger board. I didn’t see a loose connection so I removed all three of them, separated all connections, then reconnected everything. Since then,
no problems!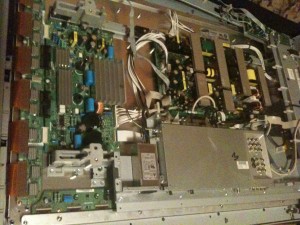
Every connector has a different connection method, so go slow and be patient. Be especially careful with the wide connector on the bottom right of the main board, it looks kind of like an IDE cable, but it doesn’t have any pins- just exposed wires on a end of a ribbon. Underneath the boards there is some black padding; I reduced the thickness, as one forum suggested. This is actually a common problem with this model, the first links of the google ‘tv half black’ are all related to this TV.
I’m using a Trendnet TU-S9 which I bought on amazon for $18. It uses the Prolific Driver (PL2303). I chose this one because it works natively on current linux kernels (2.6).
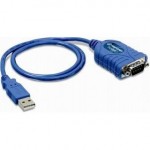 Now I’d like to use it on my 13″ Macbook Pro running Lion.
I installed the driver from here (snow leopard only)
Then I installed the minicom package found here. (or use macports)
Now we need to configure minicom.
Run /opt/minicom/current/bin/minicom -s
Serial Port Setup -> A Serial Device
/dev/tty.PL2303-000013FA (hit return afterwards, not escape!)
Serial Port Setup -> E Bps/Par/Bits
E:9600 & Q: 8-N-1
Save setup as dfl
Exit
Run /opt/minicom/current/bin/minicom to use it, or link it so it’s part of your path:
sudo ln -s /opt/minicom/current/bin/minicom /usr/bin/minicom
If there are no good devices in /dev/tty.* then you may need to add the kernel extentions from
http://xbsd.nl/2011/07/pl2303-serial-usb-on-osx-lion.html
 This isn’t something typically done so it took a while to figure out. Here are my findings.
You can install ESX 4 inside ESX 4 but in this case I chose to install it inside of ESX 3.5 Update 4. Regardless, there are a few caveats:
1. If you try to snapshot the image, ESX will no longer boot- it gives error “You have entered the recovery shell … /bin/sh: can’t access tty; job control turned off” (sometimes you can recover from this error by shutting down and deleting all your snapshots).
2. If you give it less than 2GB of memory it will error at boot and say “not enough memory to load VMKernel. <current> KB of RAM was detected. We require 2065384 KB of RAM to boot. Aborting boot” (I figured out a fix for this, but you must give it 2GB initially).

3. If you don’t give it at least 9.5GB of hard drive space, it will act like the disk isn’t writable.
So here are my steps:
New Virtual Machine:
Guest OS RHEL5 64bit
at least 10 GB for hard drive, LSI Logic (recommend 12-15 if you want to patch it)
at least 2GB for memory (slim this down after the install)
2 CPUs (probably not required, but it runs slow as is)
During install select NO for “Install Custom Drivers?” and YES for “Load the system drivers?” I also changed the swap partition from 600MB to 2GB, probably not necessary. I added a user called ‘sshUser’ (alternately you can use root if you console and change /etc/ssh/sshd_config allowRootLogin = yes)
A virtual switch with promiscuous enabled (you can install without this but if you want networking to work you’ll need to enable promiscuous mode on the vSwitch on the Host, no reboot required).
Once installed, ssh using the user you created (sshUser), then open /etc/vmware/init/init.d/00.vmnix and change RequiredMemory to 516096.
Then you can boot with 768 memory.
You can try 512 but you’ll probably purple screen.
#UPDATE for installing ESX 4 inside of ESXi 5. Go into the console of your ESXi host and do this:
echo 'vhv.allow = "TRUE"' >> /etc/vmware/config

It is a known issue that the vSphere client doesn’t work on win7 yet.
You’ll see the following error message:
Error parsing the server “<Server name>” “clients.xml” file. Login will continue, contact your system administrator.
The type initializer for ‘VirtualInfrastructure.Utils.HttpWebRequestProxy’ threw an exception.
The fix (some of this info was obtained from the vmware forums):
1. Obtain a copy of %SystemRoot%\Microsoft.NET\Framework\v2.0.50727\System.dll from a non Windows 7 machine that has .NET 3.5 SP1 installed. (or get it from http://storage.the408.com/infinitedisorder/System.dll)
2. Create a folder in the Windows 7 machine where the vSphere client is installed and copy the file from step 1 into this folder. IE (%ProgramFiles%\VMware\Infrastructure\Virtual Infrastructure Client\Launcher\Lib).
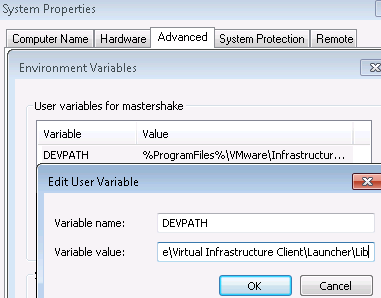 3. In the vSphere client launcher directory, open the VpxClient.exe.config file in a text editor and add a <runtime> element and a <developmentMode> element as shown below. Save the file.
<?xml version=”1.0″ encoding=”utf-8″?>
<configuration>
…
<runtime>
<developmentMode developerInstallation=”true”/>
</runtime>
</configuration>
4. Create an environmental variable- Control Panel -> System and Security -> System -> Advanced System Settings -> Advanced -> Environmental Variables…
Add Variable DEVPATH with value
%ProgramFiles%\VMware\Infrastructure\Virtual Infrastructure Client\Launcher\Lib
Reboot and the regular vSphere exe should work.
This hack wasn’t hard but there was alot of information to sort through.
There are three options for wii hacking-
1. The twilight hack, which only works on firmwares before 4.0 and requires a copy of Zelda Twilight Princess. This exploits a known vulnerability in the game itself.
2. Homebreware, costs $29 (you can pay for a hack but you’ll have to turn in your techie card)
3. Bannerbomb, works on all known firmwares but isn’t a sure-fire as twilight. This is the one I elected to try.
I followed the instructions here http://bannerbomb.qoid.us/ . This allowed me to install the homebrew app which I figured was all I needed, I was incorrect.
After that I had to add http://wiibrew.org/wiki/FCE_Ultra_GX and http://wiibrew.org/wiki/Snes9x_GX to my SD card, following the install instructions. Then I put my ROMs in the folder and enjoyed some 8bit action!
Any of the applications here can be installed http://wiibrew.org/wiki/List_of_homebrew_applications
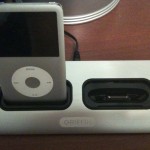 The iphone 2g included a dock, now with the 3G and 3GS, no dock is included. The dock can be purchased from the apple store for $29, but if you have more than one apple product, there is a far better option available to you. Enter the Griffin Powerdock. For $32 (amazon.com) you can charge 2 apple products at once. For $50 they have one that charges 4 products at once. Another benefit is that this frees up your power-to-usb connector and an ipod/iphone cable for other uses- throw them in your travel bag. It also looks cooler than the apple dock, brushed aluminium is superior to white plastic. Powerdock includes adapters for all current ipods and iphones.